Linux File Shenanigans

During my studies, I made a shift from Windows to Linux (Ubuntu) as the Operating System that I use privately. I swore off ever using Windows again, because I fell in love with the simplicity of the Linux file system. Unfortunately, even an ethical hacker (my current job) has to use Windows to write reports and as a target Operating System, because basically every company uses Windows for its day-to-day business. Nonetheless, I would like to share some things that I have learned over the years regarding the Linux file system.
Linux, or actually GNU/Linux (if you ask Richard Stallman), is a family of operating systems based on the Linux kernel, packaged with system software and libraries (mostly from the GNU project). In Linux, similar to other UNIX(-like) operating systems, input/output to and from resources such as documents, hard-drives, modems, keyboards, printers, etc. is handled as simple streams of bytes exposed through the file system.
“Everything is a file” is a common way to describe the philosophy behind UNIX and Linux (although not entirely correct). The statement is true in the sense that Linux does not differ between files and directories (directories are just a special type of file, pointing to other files). And, as mentioned before, devices and such are handled as part of the file system. Of course, this does not mean that processes are part of the file system.
Let us have a closer look. I used my own Kali Linux distribution to create the images in this article.
mkdir
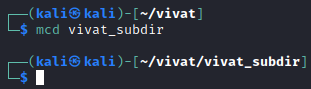
First, we’ll make a directory for our tests using the command mkdir (make directory) (Figure 1).
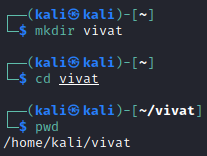
Although this command is quite clear, through numerous encounters with making new directories during penetration tests, I discovered that it has one fatal flaw. (Almost) everytime I have to make a new directory, I find myself having to change directory (cd) to the new directory directly after. To combat this (first world) problem, I defined my own mcd (make and change directory) as follows:mcd() { mkdir -p $1 && cd $1; }
Executing the command above directly shows the effect as intended, as our current working directory is instantly changed to the newly created directory after executing the command (as can be seen in Figure 2):
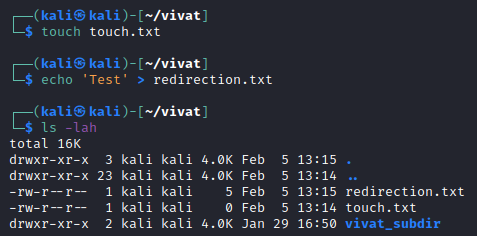
touch
To be able to further demonstrate the simplicity of the Linux file system we need to add some dummy files. We can create files in several manners, of which I describe three below:
The first command is the touch command, which only adds the new file (with the name as specified when issuing the command). While this touch.txt file is useful enough for my explanation on the Linux file system, the file does not have any contents.
Another way of creating a new file is redirecting text on the terminal to a file using the angle bracket (>). By writing the intended contents of the file to the terminal output (using the echo command) and redirecting the output to a file, we can add contents to a newly created file.
It is also possible to redirect output using two angle brackets (>>) (which appends to instead of overwrites the file specified).
As an added bonus: an angle bracket the other way around (<) redirects the contents of the file to the terminal as input.
There are, of course, many other ways to create files.
ls
Moving on, the ls command can be used to list (parts of) the filesystem (similar to dir on Windows). Almost every time, I use the following flags, for the best readability.-l to display lengthy output, including the file permissions-a to includes all files in the output of the command, including ‘hidden’ ones (files starting with a . on Linux)-h to display human-readable format for file sizes (uses K, M etc. to abbreviate the file size, instead of showing all bytes)
Using the -l flag, we list permissions of files (and directories) test file hierarchy. These are displayed using the (example) string -rw-r–r–. Admittedly, it took me way too long to understand the permissions string. A similar string is used to display the file permissions on Windows, but much less readable and understandable (and much lengthier).
The first character in the permissions string annotates the type of the ‘file’. The character d is used to specify a special type of ‘file’, a directory (or a file ‘containing’ other files). Normal files are instead annotated using a dash (-). Links to other files (similar to Windows’ shortcut) are annotated using a lowercase l.
The ‘type’ character is followed by three triads of three characters each. rw- and r-- (twice) respectively in the example. The three characters specify ‘read’ (r), ‘write’ (w) or ‘execute’ (x) permissions for different groups of users. The first triad specifies the permissions of the user owner of the file (the first kali in the Figure 4). The second triad specifies the permissions of the group owner of the file (the second kali in Figure 4).
The third triad specifies the permissions of all other users on the file (or directory) specified. A dash (-) signals that a permission is turned off, an r, w or x specifies that a permission is turned on. The root user is not affected by file permissions and has all permissions on all files (and directories) in the file hierarchy.
Some example file permission strings are:-rw-r--r-- means that only the user owner of the file can read and write to the file, while others can only read the file-rw-rw-rw- means that everyone can read and write to the file-rwxr--r-- means that only the user owner can read, write and execute the file. Other users can only read the filedrwxr-xr-x describes the default permissions for a new directory. The user owner of the directory can read the directory, write to the directory and read the contents of the directory. The other users can only read the directory and read the contents of the directory (specified with an x for directories as directories are never executable).
chmod
In order to change the permissions of a file, one can use the chmod (change mode) command (Figure 5).
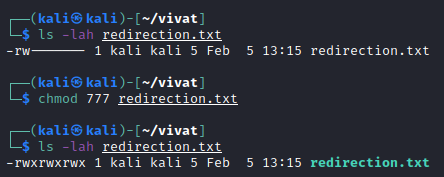
chmod usageThe command lets us specify the file permissions in two ways, namely one in which we specify the groups of users and which permissions to add or to remove:chmod g+w {file} to add write permissions for the group owner of the file.chmod a+x {file} (equal to chmod +x {file}) to give all three groups of users the execute permissionchmod u+x {file} to give execute permissions to the user ownerchmod o-rwx {file} to remove read, write and execute permissions for all other users
It is also possible to specify permissions using their numeric values, completely overwriting the previous values. This command uses the numerical representations of read (4), write (2) and execute (1) permissions to specify the permissions. For example, chmod 777 {file} would give read, write and execute permissions to all users, while chmod 600 {file} would only give read and write permissions to the user owner of the file.
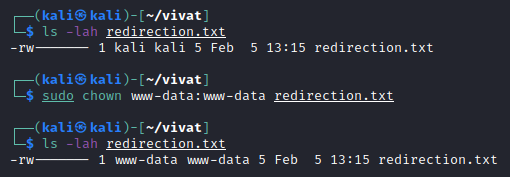
chown
Another command to change the permissions certain users/groups have on a file is the chown command (change ownership) as it changes the user owner and/or the group owner of the file to another user and/or groups (Figure 6). By default, file permissions persist when changing ownership (which only the root user is capable of). The following command and parameters are used to change file ownership: chown {user owner}:{group owner} {file}
chown usageSpecial file permissions (SUID, GUID & Sticky Bit)
In addition to the read, write and execute permissions, which are most common, Linux distributions have several ‘special’ permissions. For example, when looking at the binary executable of the passwd (Figure 7) command, one can see an s at the execute permissions of the user owner in the place where one would expect an x or a -.
This special permissions is called the SUID bit, which signals that this file is always executed with the permissions of the user owner of the file (root in case of the passwd binary). This special permissions is useful as this allows other users to change their password, which requires write permissions to the /etc/passwd or /etc/shadow files. As these files are owned by the root user, the SUID bit allows other users to change their password in the context of the root user. While many legitimate uses exist for the SUID bit, some binaries might also allow a normal user to escalate privileges to the root user, so be careful when setting the SUID bit.
Example binaries that allow for privilege escalation in this way can be found on: https://gtfobins.github.io/#+suid
The SGID is similar to the SUID bit, but is mainly used on directories. Setting this permission ensures that all sub directories and files inside the directory will get the same group ownership as the main directory (useful for web directories and such).
The final, special, permission is the so-called sticky bit (annotated using a t instead of an x in the ‘other users’ group) and only used on directories. This directory permission ensures that all files in the directory can only be deleted or renamed by the file owner (and the root user). This ensures that other users cannot delete files belonging to other users in a shared directory (e.g. the /tmp directory on Linux).

passwd executableStandard I/O streams
When using the terminal (a shell) on Linux, input and output are handled as streams of characters. The following three standard file streams exist:stdout (or standard out) displays output from commands (with file descriptor 1)stderr (or standard error) displays error output from commands (with file descriptor 2)stdin (or standard in) displays input for commands (with file descriptor 0)
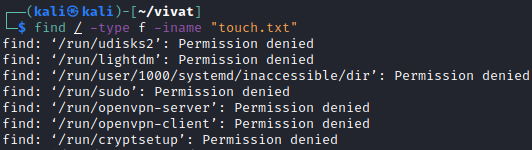
Manipulating these streams is quite easy and also very useful. For example, the following command returns a lot of errors (Figure 8).find / -type f -iname "touch.txt"
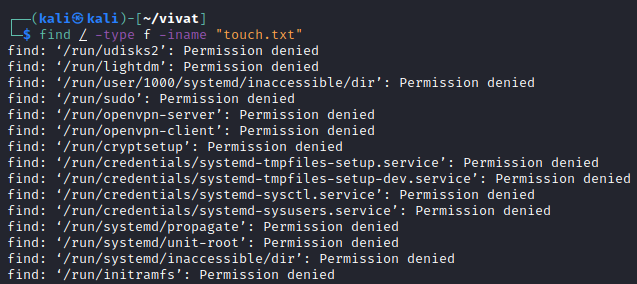
We use the find command to find the touch.txt file that we created earlier in our file hierarchy. We use a slash (/) to search in the root directory and all its sub directories. Additionally, we only want to have files (-type f) returned (and thus omit directories matching our search from the search results). Using the flag -iname, we can specify a (case-insensitive) file name (using a regex).
Executing this command the first time, ensures that we receive many errors (Figure 8), because the command executed also tries to read many files in directories which our current user does not have permissions to (Permission denied). We can manipulate the standard error stream to write its output to /dev/null (an empty void) by specifying the following command:find / -type f -iname "touch.txt" 2>/dev/null
This redirects the error output (stderr, 2) to the /dev/null file, just as we saw earlier with the output redirection brackets (>) (Figure 9).

Conclusion
While I barely scratch the surface of the complexity of the Linux Operating System, with this article, I hope to have given you an insight into several aspects of Computer Science that, at least for me, remained untouched during University.
References
https://en.wikipedia.org/wiki/Linux
https://en.wikipedia.org/wiki/Unix
https://en.wikipedia.org/wiki/GNU_project
https://en.wikipedia.org/wiki/Everything_is_a_filehttps://boinc.berkeley.edu/wiki/Linux_file_permissions
https://linuxhandbook.com/suid-sgid-sticky-bit/
https://gtfobins.github.io/#+suid
https://developer.ibm.com/tutorials/l-lpic1-103-4/